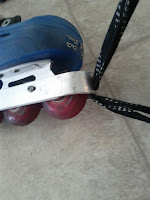
First, the modification...
I purchased a piece of 1" wide 1/8" thick aluminum flat stock from Lowe's (for like $6) along with a bag of 10-24 x 3/8" machine screws ($2 ish).
- I cut two pieces of the bar stock to 12 3/4" long found the center and bent them in half around my weight-bench bar (it was the closest in diameter to the chassis' width) so I had (2) U-shaped brackets.
- Next I drilled a hole in the lower part of the U so I could thread my laces through it (I actually did this later, but it's appropriate to mention it here).
- Finally I positioned the brackets over the chassis and drilled holes for the screws using a 3 step process:
- Step 1 - Drill hole through both the bracket and the chassis using drill bit matched to my 10-24 tap (making sure to center my drill bit between the spaces in the wheels but higher than center vertically so as to make sure that the screws wouldn't interfere with the wheels..it is also important to make sure the U in the front has enough clearance from the wheel to allow for laces to easily thread through the hole from the wheel-side out the front);
- Step 2 - Remove bracket, drill out larger hole for 10-24 screw to slide through (I ultimately had to slot these holes later to get more clearance between the bracket and the front wheel, but if you leave enough room for the laces as I mentioned in Step 1 then simply widening these holes is sufficient).
- Step 3 - Tap the hole in the chassis with 10-24 tap set (there really isn't room to use a nut on the inside, so tapping these holes is the best option. I thought about what I will do should the threads wear out and I think you might be able to put the rounded head of the screw on the inside and a nylon-inserted lock-nut on the outside. It would also be less likely that you'd wear the threads if you drilled clearance holes for the wheel bearing screws and applied some loctite to the screws since you, then, wouldn't have to remove them to change wheels/bearings out.)
| The Modified Chassis: | |
 |  |
 | |
Next, the toe-tie method...
Finally, some shots of the pad tied the way LABEDA designed it (to show the original problem)...
| No wonder I couldn't stop anything standing up! | |
 |  |


No comments:
Post a Comment